Search within:

Amenities


General Room Information

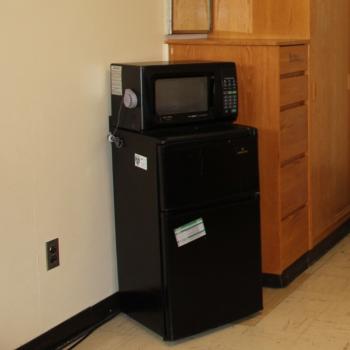
Rooms are fully air conditioned and furnished per person with a bed, mattress (80 inch XL-twin size), desk and chair, freestanding or built-in dressers, and closet space. Collectively the room shares the recycling bin, wastebasket, and microfridge. Bathroom tissue paper is provided in all residence halls.   

Most rooms have pull shades at each window. The Convocation Center rooms have mini-blinds and Bromley Hall has curtains instead of pull shades. If you would like more than a shade or mini blinds, you and your roommate(s) may bring curtains or a valance along with a tension (spring) rod for hanging those up. The inside window measurements are listed on the floor plan of most rooms. 

You may not remove University furniture or furnishings from the room. 

Rental Opportunity-Bed Loft

Carr 381 with bed loft

Ohio University Residence Hall Association partners with Bedloft.com to offer students a number of convenient, affordable products and services to create more space in their residence hall room. Students can place their order online at Bedloft

Bedloft.com, our official loft company, has been provided with room data to assist with your decision. Rented lofts must be returned the last week of classes spring semester following the instructions provided to the student via Bedloft.

Only lofts obtained through Bedloft.com or provided by the university will be permitted. No personally constructed lofts or lofts that require our beds to be disassembled are allowed! Cinderblocks used to construct a make-shift loft are unsafe and cause damage to floors. Students may purchase commercially made plastic bed risers to allow for more space under a bed. These should be no higher than 12 inches. All requests to bunk beds should be made through Facilities Management.

Place your order by the August 6, 2024 deadline on the site to guarantee FREE bed loft delivery and assembly to your room before move-in day. 

Please visit the FAQ section of the website if you have any questions or contact Bedloft.com via e-mail at support@bedloft.com or by phone toll free at 866-651-5638.

Frequently Asked Questions

What triple rooms does the University supply a bed loft for?

All beds in 4 University Terrace have a loft provided by the University. In addition, most triple rooms have one loft provided by the University. Normally these rooms will not accept an additional loft.

The following triples DO NOT have a university provided bed loft.

  • Biddle 112, 209, 212, 426
  • Bush 324
  • Jefferson 304, 352, 455
  • Lincoln 406
  • Read 115, 309, 333, 406, 408
  • Shively 202, 215
  • Pickering 432
  • James 242, 256
  • Bromley 208, 308, 310, 408, 508, 510, 608 ,618, 628, 708, 710, 718, 728, 808, 810, 818, 828, 908, 910, 918, 928

If you are assigned to a triple, we recommend you wait until you arrive to decide if a loft will work in your particular room.

What rooms on East Green cannot accommodate a bed loft?

It is important to note that lofts may be utilized in most, but not all residence hall rooms. Be sure to read the information below to determine if your room will not accommodate a loft. The following rooms have dormer (slanted ceilings and/or walls) and may not accommodate a loft. We suggest that the student wait until they have a chance to evaluate the space within the room and discuss lofting and room configuration options with their roommate(s) prior to ordering a loft.

The rooms listed below in BOLD definitely will not accommodate a loft:

  • Biddle The entire 4th floor
  • Bush 331 and the entire 4th floor
  • Gamertsfelder 319-322, 324, 343-354, 371-376, entire 4th floor
  • Jefferson 346-349, 392-397, entire 4th floor
  • Lincoln 325-341, entire 4th floor
  • Perkins 302, 304, 306, 331, 332, 334, and the entire 4th floor
  • Read 323, 402, 406, 408
  • Shively 232, 234, 236, 237, 238, 240, 241, 242, 244, and the entire 3rd floor
  • Tiffin 301-313, 315, 338, 340, 341, 344-352, and the entire 4th floor, except 410
  • Voigt the entire 4th floor
  • Washington 301-312, 343-347, and the entire 4th floor

Biddle, Read, and Johnson Halls have desks with shelves that do not fit under a loft. This limits room arrangement options.

Tiffin Hall beds do not have adjustable frames so they are not able to be lifted (height lowered or raised).

What rooms on South Green cannot accommodate a bed loft?

It is important to note that lofts may be utilized in most, but not all residence hall rooms. Be sure to read the information below to determine if your room will not accommodate a loft. The following rooms have dormer (slanted ceilings and/or walls) and may not accommodate a loft. We suggest that the student wait until they have a chance to evaluate the space within the room and discuss lofting and room configuration options with their roommate(s) prior to ordering a loft.

The rooms listed below in BOLD definitely will not accommodate a loft:

  • Tanaka 415-421, 423, 431-438
  • Carr 415-421, 423, 431-438
  • Luchs 417-421, 423, 431-436
  • Sowle 417-421, 423, 431-436

In Brown, Crawford, Mackinnon, and Pickering, quads will not accommodate a loft in the sleeping room, nor can the beds be lifted. Doubles may be limited to lofting depending on room dimensions. 

South green "mod style" buildings (buildings other than those listed above or suite style buildings) also have desks with shelves that do not fit under a loft. This limits room arrangement options.

What rooms on West Green cannot accommodate a bed loft?

It is important to note that lofts may be utilized in most, but not all residence hall rooms. Be sure to read the information below to determine if your room will not accommodate a loft. The following rooms have dormer (slanted ceilings and/or walls) and may not accommodate a loft. We suggest that the student wait until they have a chance to evaluate the space within the room and discuss lofting and room configuration options with their roommate(s) prior to ordering a loft.

  • Boyd 321, 322, 338, 339, 343-364, 366, and the entire 4th floor
  • James 301-304, 308-311, 335-343, 349-356, and the entire 4th floor
  • Ryors 320, 321, 331, 335-341, 343-345, and the entire 4th floor
  • Sargent 301-304, 308-312, 335-343, 347, 348, 350, 351, 353-356, and the entire 4th floor
  • Treudley 303, 328, 330, 332-338, 340-342, and the entire 4th floor
  • Wilson 319-320, 322, 324, 326-328, 360, 361, 369-375, and the entire 4th floor

The Convocation Center has desks with shelves that do not fit under a loft. This limits room arrangement options.

Can I purchase any items from Bedloft.com to compliment my bed loft rental?

Yes, you can purchase a futon and a loft shelf. These items are yours to keep after purchase and are not returned with the bed loft rental at the end of the year.

  • Futon: The versatile futon can be used as a love seat, lounger, or full-sized bed and is customized to fit under the bed lofts at Ohio University. A great way to have additional seating in your room for you and your friends!
  • Loft Shelf: The shelf is a perfect and convenient way to keep essential items, such as a phone or water bottle, close to your bed. It easily attaches to your bed loft and holds up to 15 lbs. 

What is the difference between lofting and lifting the bed?

Bed lofting is the use of a metal frame to raise the bed to bunk bed height to allow for additional livable space beneath the bed. Many students use the space for other furniture like a desk or micro-fridge, or to place a chair or futon. The loft can only be rented through bedloft.com. Any home crafted or other company loft products are prohibited due to safety regulations with university furniture.

Most OHIO beds can be lifted, which means the height of the bed can be adjusted up and down the bed frame.* Most OHIO beds can allow for 24 inches of space if the bed is lifted to the highest level. Students can request for the height of their bed to be adjusted by Facilities staff. During fall move-in, Facilities will make rounds of the halls and will complete any requests. Students can place their name on a list at the staff office for this. After move-in and during the year, students can place a work order to have the bed lowered or raised.

*Quads in Mackinnon, Pickering, Brown, and Crawford and all rooms in Tiffin do not have adjustable bed frames and cannot be lifted. These beds allow for 15" of space beneath.


Do beds that come bunked have to remained bunked?

Depends. The quads on the Front Four (Brown, Crawford, Mackinnon, and Pickering) cannot be unbunked and the beds must remain in the back part of the quad (the sleep section of the sleep/study set up). Additionally, many triple rooms may not have enough configurable space to have three sets of furniture in the room without blocking egresses without two of the beds being bunked.

Prior to fall move in, most rooms where the beds can be unbunked, will be. If the beds are bunked, and the space can accommodate the beds not being bunked, the student can request for them to be separated. During fall move-in, Facilities will make rounds of the halls and will complete any requests. Students can place their name on a list at the staff office for this. After move-in and during the year, students can place a work order to have the beds bunked or unbunked.

Micro-fridge Information and Instructions

Each room is equipped with a combination refrigerator / freezer and microwave. This convenience makes late-night snacks much easier and safer than the traditional (and prohibited) hot plate. Please know that the electrical capacity is limited, so adding an additional refrigerator unit is not permitted.

microfridge unit in a residence hall
Operating Tips

Ohio University prohibits the installation of personal refrigerators.

Please be aware of the following operating functions with your combination unit:

  • Power to the refrigerator will automatically be shutoff when the microwave is in operation.
  • There is a 3-minute delay before power to the refrigerator is restored.
  • The motor will start and stop often to maintain the temperature you select.
  • If the unit is freezing food items, check the temperature settings to troubleshoot.
  • For directions on controlling unit temperature refer to the use and care section below.
  • The unit should be plugged directly into the wall outlet. Do not use extension cords/power strips.

Residents are responsible for keeping the units clean and for damages incurred, missing parts, and excessive cleaning charges, if the unit is not properly maintained during occupancy of the room.

If you are experiencing trouble with your unit, please review the usage and care instructions below for basic troubleshooting tips. If the unit is still not operating properly, please fill out an online work request.

Use & Care

The following information pertains to Absocold "Cook n' Cool" units installed on campus.

Standard Units

  • Installed in single, double, and triple size rooms
  • Capacity 2.9 cubic feet
  • Dimensions: Height 44 ¾", Width 18 ½", Depth 19 ½"

To control temperature: Normally, the Temperature Control Knob should be at the “3” position. Colder temperature can be selected by turning the knob counterclockwise towards the “1” position.

When room temperature is high and the Temp Control Knob is set at “5” or “MAX” position for a long time, it is possible that the evaporator of the refrigerator compartment will be frosted heavily, which may cause insufficient cooling of the refrigerator compartment. In this case, the Temp Control Knob should be set at the “2” position or below until the heavy frost is gone. Later set the knob back to its normal setting.

Refrigerator compartment temperature and freezer compartment temperature will vary depending on the quantity of foods stored and on the frequency with which doors are opened.

To Defrost: This refrigerator/ freezer has separate defrosting systems, one for each compartment.

  • Freezer Compartment: When the freezer compartment is frosted about ¼ inch thick, defrosting is required. Frosting will interfere with proper freezing. When frost is thin or soft, scrape off and remove frost on freezer compartment walls with scraper provided. This can be done without interrupting freezing operation. When frost is hard or heavy, remove foods from freezer compartment. Next, set the Temp Control Knob at the “OFF” position. When ice/frost on the side walls and ceiling of the freezer compartment comes off, remove ice and melted water with the scraper provided and a cloth. After defrosting, reset Temp Control Knob at normal position.
  • Refrigerator Compartment: As long as the Temp Control is set at the normal position, the evaporator of the refrigerator compartment is automatically defrosted and no manual operations are needed to defrost. Defrosted water is drained out to the evaporating tray on the back of the refrigerator cabinet.

Large Units 

  • Installed in Quad size rooms
  • Capacity 4.8 cubic feet
  • Dimensions: Height 57", Width 18 ½", Depth 22 ¼"

To control temperature: At first, set the refrigerator and the freezer temperature controls on "MED". Wait 24 hours for the entire cabinet to cool. Then adjust controls, if needed. Setting "MIN" is the warmest. Never turn cold control "OFF" unless both sections are empty.

Microwave Instructions

Setting the Time

  1. Touch STOP / CLEAR.
  2. Touch CLOCK.
  3. Enter the time by using the number key pads.
  4. Example: To set 3:15, touch number key pads [3], [1], and [5].
  5. Touch CLOCK.

Timed Cooking

Many foods need slower cooking (at less than HI power) in order to give you the best results. In addition to HI-POWER, there are 10 multi-power settings. Example: If you want to cook food on 80% Power (Power 8) for 5 minutes 30 seconds.

  1. Touch STOP / CLEAR.
  2. Touch TIME. Display shows 0.
  3. Enter 5 minutes 30 seconds by touching [5], [3], and [0].
  4. Touch POWER. P-HI appears in the display. This is to tell you that the oven is set on HI unless a different power setting is chosen.
  5. Touch [8] to select power level 8.
  6. Touch START. Two short and one long tone sound and the word END shows in the display window when the cooking time is over. Then the oven shuts itself off.

Ez On

Ez On allows you to cook for 30 seconds at 100% power by touching the Ez On pad. You can also extend cooking time in multiples of 30 seconds by repeatedly touching Ez On during cooking.

  1. Touch STOP / CLEAR.
  2. Example: To set cooking for 2 minutes...
  3. Touch Ez On 4 times. Oven begins cooking and display shows time counting down.

Timer

Timer can be used for purposes other than cooking. Be sure to follow these steps to properly use the microwave as a timer. Do Not operate / run the microwave while it is empty as a timing mechanism.

  1. Touch STOP / CLEAR.
  2. Touch TIMER.
  3. Touch numbers for time, [3], [0], [0]. (Ex. 3 Minutes)
  4. Touch START
Safety Instructions

The unit must be properly grounded. Connect only to properly grounded outlets. Unless the grounding method is followed, you are not protected against severe or lethal shock, in the event of a short circuit of an electrical component or wiring of the refrigerator.

  • Do Not use extension cords or multi-connection power strips.
  • The unit should be plugged directly into the wall outlet.
  • If you unplug the refrigerator, allow at least three minutes before restarting.
  • Allow 24 hours for your refrigerator to reach a new temperature setting.
  • In case of a prolonged power outage or an electrical disconnect, check unit for spoiled food.
  • Use the three-prong plug with a three-prong grounded wall outlet.
  • Use 120 volts, 60 Hz. (60cycles A.C.)

Reduce the Risk of Fire

  • Do Not use the cavity for storage purposes.
  • Do Not use aluminum foil during cooking cycle.
  • Do Not leave paper products, cooking utensils, or food in the cavity when not in use.
  • Do Not overcook food. Carefully attend appliance when paper, plastic, or other combustible materials are placed inside the oven to facilitate cooking.
  • Remove wire twist-ties from paper or plastic bags before placing bag in oven.
  • If materials inside the oven ignite, KEEP OVEN DOOR CLOSED, turn oven off, and disconnect the power cord or shut off power at the fuse or circuit breaker panel.

Avoid Possible Exposure to Excessive Microwave Energy

  • Do Not attempt to operate this oven with the door open since open-door operation can result in harmful exposure to microwave energy. It is important not to defeat or tamper safety interlocks.
  • Do Not place any object between the oven front face and the door or allow soil or cleaner residue to accumulate on sealing surfaces.
  • Do Not operate the oven if it is damaged. It is particularly important that the oven door close properly and that the door is not bent, hinges and latches are not broken or loosened, and no damage to the door seals and sealing surfaces has occurred.

Reduce the Risk of Personal Injury While Using Product

  • Use this appliance only for its intended use as described on this page.
  • Do Not use corrosive chemicals or vapors in this appliance. This type of oven is specifically designed to heat, cook, or dry food. It is not designed for industrial or laboratory use.
  • Some products with sealed containers or closed jars are able to explode and should not be heated in oven. Never use your microwave oven to cook eggs in the shell.
  • Do Not operate this appliance if it has a damaged cord or plug, if it is not working properly, or if it has been damaged or dropped. Do not immerse cord or plug in or around water.
  • Do Not let cord hang over the edge of a table or counter. Keep cord away from heated surfaces.
  • Do Not cover or block any openings on the appliance.
  • When cleaning surfaces of door and oven that comes together on closing the door, use only mild, nonabrasive soaps, or detergents applied with a sponge or soft cloth.
  • As with any appliance, close supervision is necessary when used by children.
  • The oven should not be adjusted or repaired by anyone except qualified service personnel. Fill out an online work request for qualified service personnel to examine, repair or replace the unit.

Reduce the Risk of Injury While Heating Liquids

  • Liquids such as water, coffee, or tea are able to be overheated beyond the boiling point without appearing to be boiling due to surface tension of the liquid. Visible bubbling or boiling when the container is removed from the microwave oven is not always present.
  • Do not overheat the liquid.
  • Stir the liquid both before and halfway through heating it.
  • Do not use straight-sided containers with narrow necks.
  • After heating, allow the container to stand in oven for a short time before removing.
  • Use extreme care when inserting spoon or other utensil into the container.